| Download: | odbc-interbase-4_3_0-windows-x86.zip |
SMS communication technology has several advantages. In companies
it is widely used because it is a quick and reliable service for efficient
communication.
Ozeki NG SMS Gateway makes it possible to send and receive SMS messages in your
corporate IT environment. The use of this software ensures a reliable, high
quality operation. In this way you will get an effective and up-to-date system.
There are numbers of advantages of adding SMS functionality to Interbase with
this solution. As SMS messages are the fastest way of communication you can use
SMS technology
to send information from your database. Any kinds of data and information can be
sent in an SMS message and it is forwarded to the mobile device of the intended
person. This option makes it a secure solution. Moreover, you can track down
your sent and received messages as Ozeki NG SMS Gateway logs them. You will also
be informed about the status of your messages in a delivery report.
In this way you will get a well-organized
system which provides a stable workflow in your company.
All in all, if you add SMS extension to your Interbase database you will get a
well-functioning, reliable and effective communication system. This solution
offers numbers of options to improve your communication within and outside of
your company. This guide gives you detailed information on the configuration of
this solution.
Prerequisites
In order to setup this solution you need to find a way
to connect your system to the mobile network. You can do this
by using an Internet connection or you can
setup a wireless connection by attaching a GSM phone/GSM modem to your computer. To help you make a
decision, we have prepared a webpage for you:
Internet based SMS connections vs. GSM modem based (wireless) SMS connections.
Depending
on what you select, you need the following prerequisites.
Prerequisites for Internet based connection to the Mobile network
If you wish to connect your system to an SMS service provider over the Internet you need the following components:

Figure 1/a - Prerequisites for Ozeki NG SMS Gateway IP SMS connection
In this case you need to find an SMS service
provider who can reach the mobile phones in your area. This SMS
service provider should be able to provide SMS service through
the Internet. To find such a provider, you can check our
website where we list some of them:
SMPP SMS Service providers.
Once you have found such a provider, you need to sign up for
their service to get the connection parameters. You can use these parameters
to configure your Ozeki NG SMS Gateway software.
Prerequisites for wireless (GSM modem) connection to the Mobile network
If you wish to connect your system to the mobile network wirelessly, you need a GSM modem or GSM phone, that you can attach to your computer with a data cable. In this case your Ozeki NG SMS Gateway software will operate this phone and will send and receive SMS messages wirelessly. To setup this connection method, you need the following components:

Figure 1/b - Prerequisites for Ozeki NG SMS Gateway GSM modem connection
Your checklist (for GSM modem connection): |
SIM Card - You can get this from your local mobile network operator.* |
 |
Modem - Use a Wavecom, Siemens or Multitech modem. |
 |
Data cable - Comes with the modem |
 |
Computer - Recommended: Intel P4 3Ghz, 2GB RAM, 500GB HDD, Windows OS |
 |
Ozeki NG SMS Gateway - Download it from http://www.sms-integration.com |
 |
Interbase |
 |
Easysoft driver for Interbase |
*The SIM card will come with a plan, that will determine how much money you will spend on each SMS.
|
| Ozeki NG SMS Gateway can be obtained by opening the download page: Download Ozeki NG SMS Gateway! |
System architecture
SMS sending and receiving is very simple in this solution. It works as follows: If you receive an SMS, Ozeki NG SMS Gateway inserts it to the Interbase database. On the other way, if you would like to send an SMS messages from Interbase database, Ozeki NG SMS gateway polls the message out from the database, processes it and finally sends the message to the given mobile device. This simple but quick and reliable process can be examined in Figure 2.
 |
Figure 2 - Ozeki NG SMS Gateway - solution for sending SMS from Interbase
Configuration guide
To configure Ozeki NG SMS Gateway for Interbase please follow the steps below:
To send and receive SMS messages from Interbase, first, you need to install an odbc-interbase-4_3_0-windows-x86.zip file
During the installation process you need to register with an e-mail address. After the registration you need to install the ODBC driver and launch the "License Manager" (Figure 3).
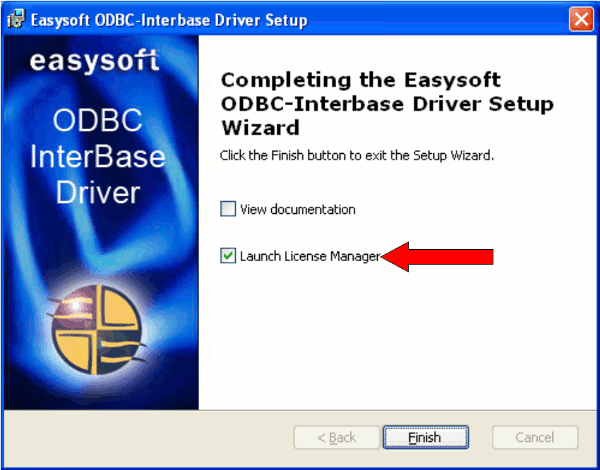 |
Figure 3 - Launch the License Manager
In the "License Manager" provide the e-mail address you used at the registration at Easysoft.com (Figure 4). After you type the e-mail address click on "Request License" button on the right hand side.
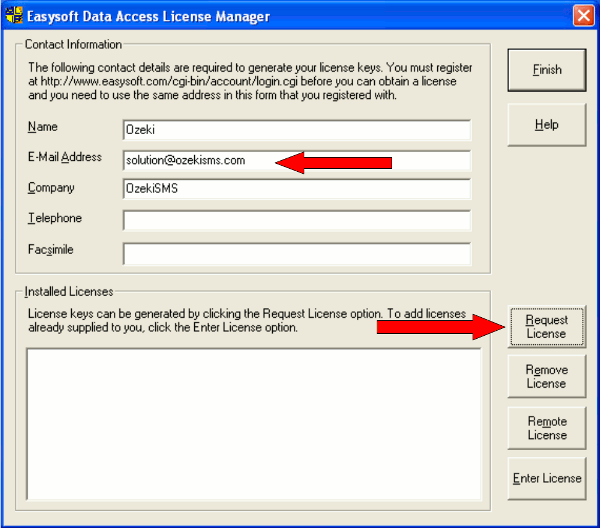 |
Figure 4 - Type e-mail address
Now select the license type: if you want to use the trial version select the "time-limited trial" option and click on the "next" button (Figure 5).
 |
Figure 5 - Select license type
Then select the product you wish to try and click "next" (Figure 6).
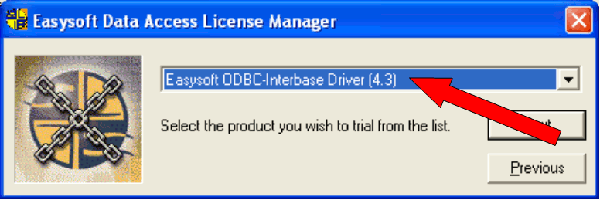 |
Figure 6 - Select the product
In the next window select one of the request mode. In our example it is "On-line request" (Figure 7).
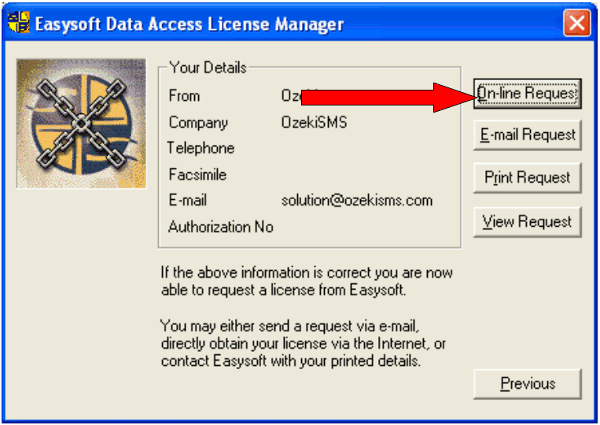 |
Figure 7 - Request a license
Finally you get the license, a window appears with a text:" One license added", then you can see the added license in the "License Manager" (Figure 8). Click on "Finish".
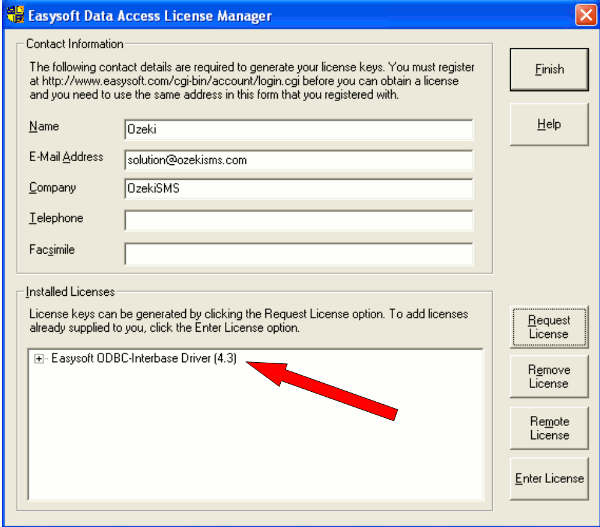 |
Figure 8 - Added license
Now you need to create the table layouts you can use in Ozeki NG SMS Gateway. To configure it, start the "Interbase Console" (IBConsole) at Start menu/All programs/Codegear Interbase/IBConsole (Figure 9).
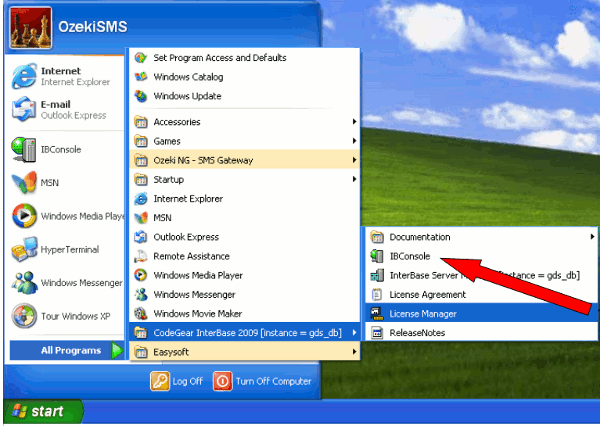 |
Figure 9 - Interbase Console
You need to extend the local server then right click on Databases icon and select "Create Database" (Figure 10).
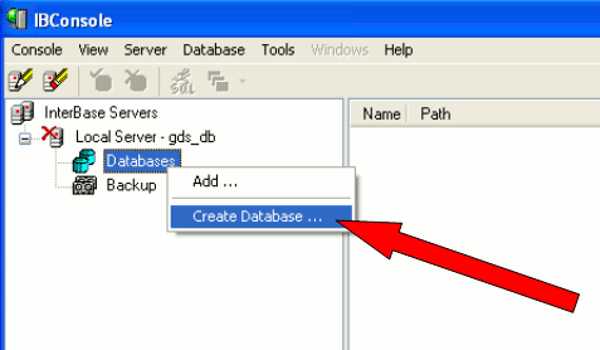 |
Figure 10 - Create database
A window appears, browse the place where you want to save your database file (Figure 11).
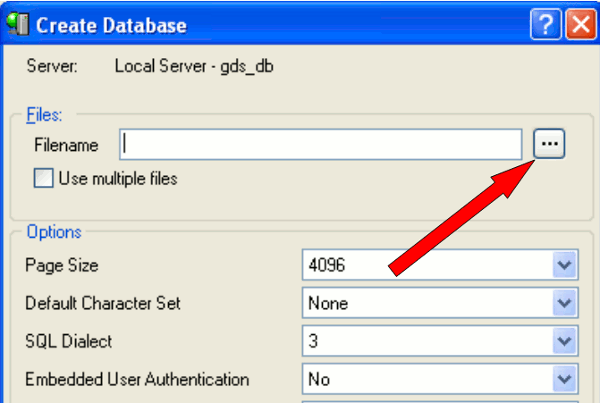 |
Figure 11 - Browse database location
Then select the place where you want to save your database file. In our example it will be saved in "C:\interbase_db\" folder under the name of "OZEKI.IB". So the full path is: "C:\interbase_db\OZEKI.IB" (Figure 12). If you finish click on "Save" and "OK".
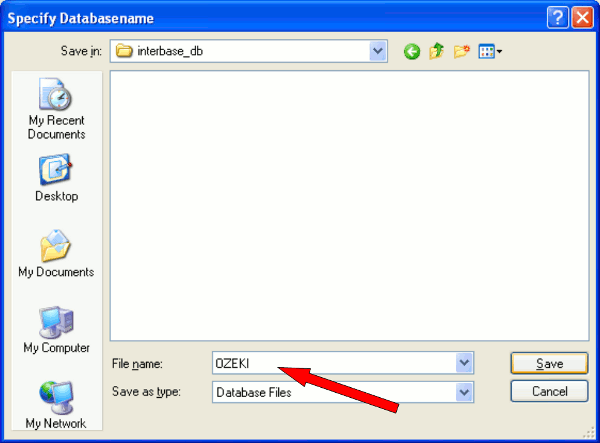 |
Figure 12 - Database file name
In the "Create database" window you can see the database to be created, and if you click on "OK" the Interbase will automatically connect to your database (Figure 13).
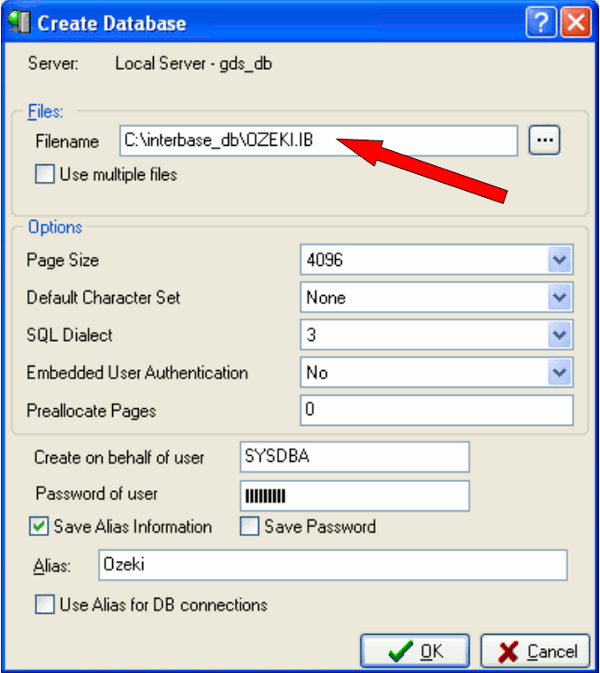 |
Figure 13 - Create database file name
In the appeared "Database connect" window you can specify with which user name you want to connect to the database. By default, "SYSDBA" is the administrator in Interbase. Its default password is "masterkey" (Figure 14).
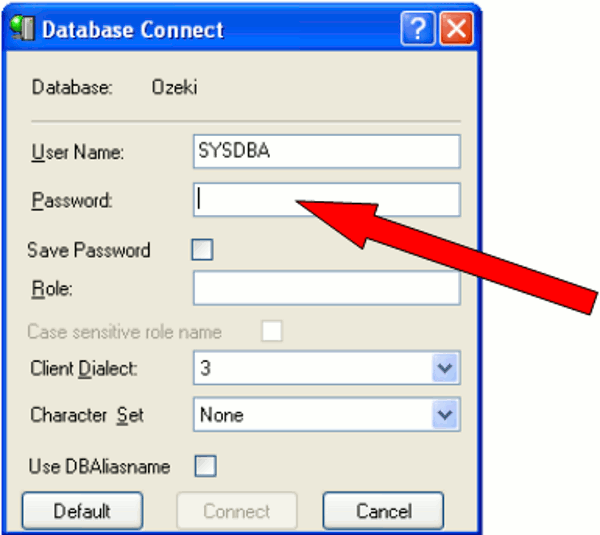 |
Figure 14 - Connect to database
After you fill the boxes, click on "Connect" (Figure 15) and Interbase will connect to the database.
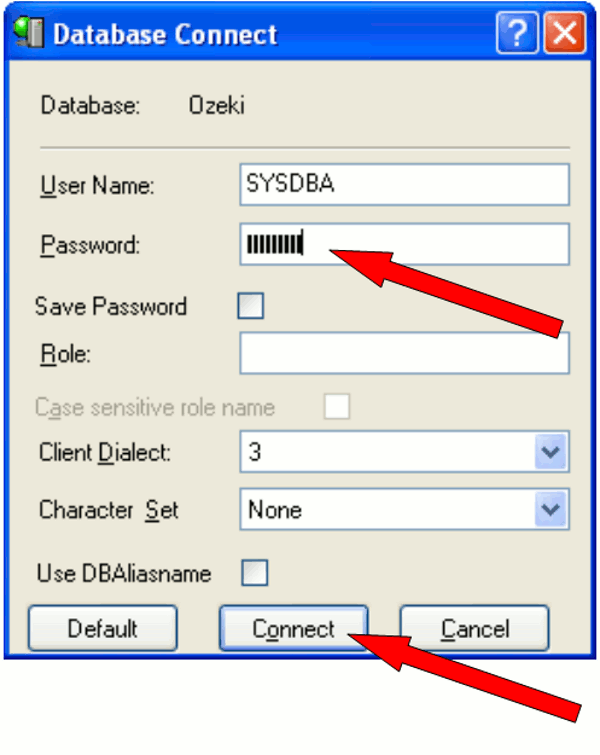 |
Figure 15 - Username for connection
When the connection is successful, click on the SQL icon at the top of the page (Figure 16).
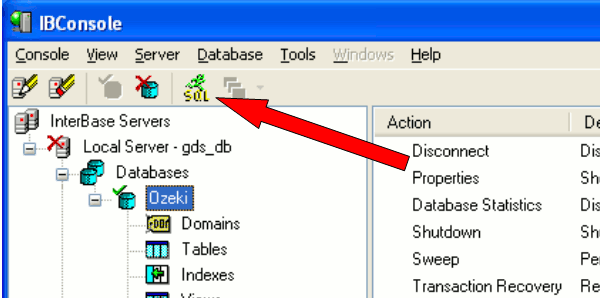 |
Figure 16 - Interactive SQL
The "Interactive SQL" window is launched and you can write your
table definitions (Figure 17) here using SQL language. You can execute your
query with F5. Since there is no auto increment property at Interbase, write
a generator and a trigger for each table. First, type the definition for
table "ozekimessagein":
CREATE TABLE "ozekimessagein" ( |
Then create a generator for table
"ozekimessagein":
CREATE GENERATOR G1_ID; |
CREATE TABLE "OZEKIMESSAGEOUT" ( |
CREATE GENERATOR G2_ID; |
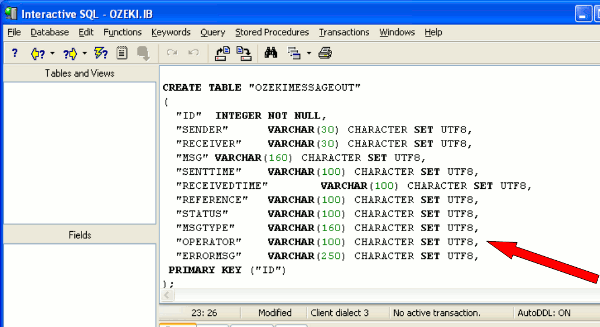 |
Figure 17 - Interactive SQL with table definitions
Now the tables and the generators are defined, close the "Interactive SQL" window. If you click on "Tables" or "Generators" you will see the created tables and generators. Then click on Triggers to write the triggers for the tables. Right click on the right side of the pane and select "Create..." (Figure 18).
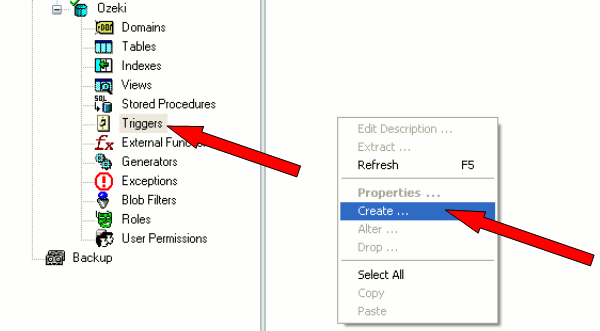 |
Figure 18 - Create triggers
First provide a name for the trigger (Figure 19): "INID".
Select table
"ozekimessagein", then write the body of the trigger between the "begin and
"end":
new.id = gen_id(G1_id, 1); |
If you finish click on "OK".
Now create a new trigger for table "ozekimessageout". Again right click on the pane and select "Create...".Provide a name for the trigger: "OUTID" and select the table "ozekimessageout". Select the generator, too: "G2_ID". Then write the body of the trigger between the "begin" and "end":
new.id = gen_id(G2_id, 1); |
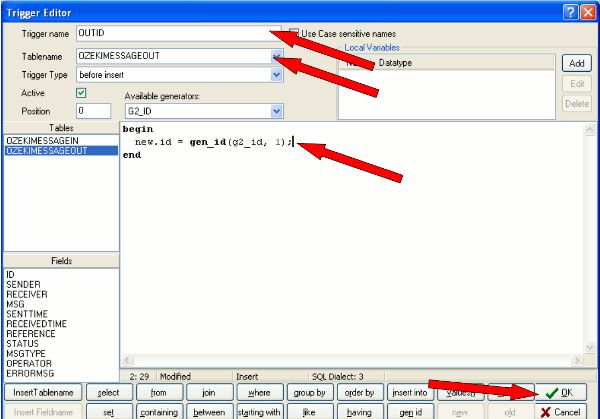 |
Figure 19 - Filled trigger editor
If it is done click on "OK" and the created triggers can be seen (Figure 20).
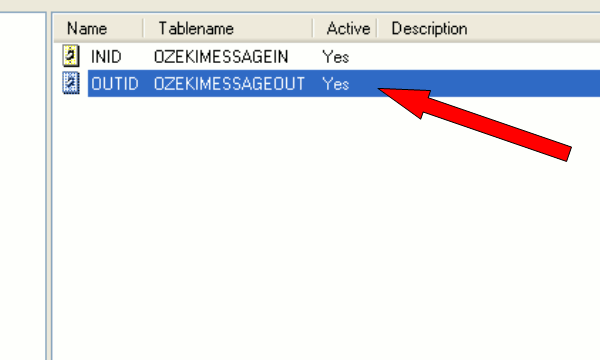 |
Figure 20 - Created triggers
Now the definitions are done and you can close the Interbase Console.
Now launch Ozeki NG SMS Gateway to configure it to be able to send SMS messages from Interbase. Login with your username and password. On the right hand side click on "Add new user or application" (Figure 21).
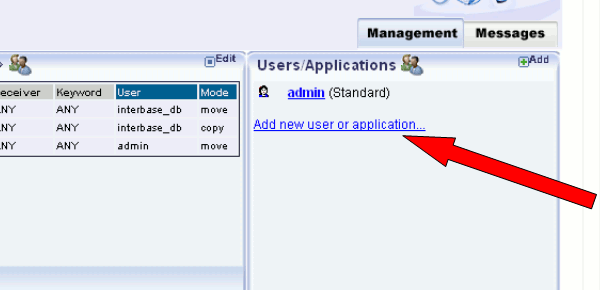 |
Figure 21 - Add new user
Select "Database user" and click on "Install" (Figure 22).
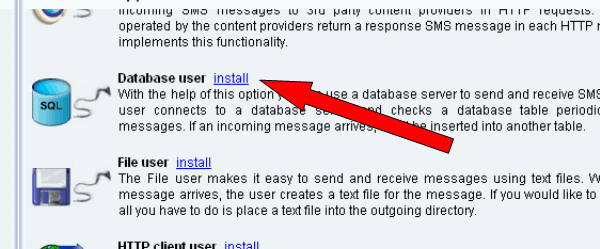 |
Figure 22 - Install database user
Now provide a name for the user. In our example it is: "interbase_db". Click on "OK" (Figure 23).
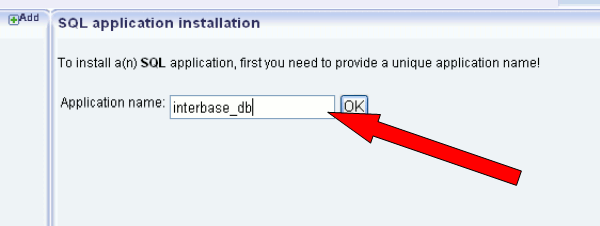 |
Figure 23 - Database user name
Select the connection string type: ODBC. Then type your
connection string for Interbase 2009:
"DRIVER={Easysoft Interbase ODBC};Server=localhost;Database=localhost: C:\interbase_db\ozeki.ib;Uid=SYSDBA;Pwd=masterkey;" |
If you use an older version of Interbase (older than Interbase 2009) then type the following connection string:
"Driver={Easysoft IB6 ODBC};Server=localhost;Database=localhost: C:\interbase_db\ozeki.ib;Uid=SYSDBA;Pwd=masterkey;" |
Please note that you need to enter the connection
strings in one line without line brakes!
The part after "Database=localhost:" refers the access path to the created
database file; after the "Uid=" part you need to provide the username you used
in Interbase; and after the "Pwd=" part specify the password
(Figure 24).
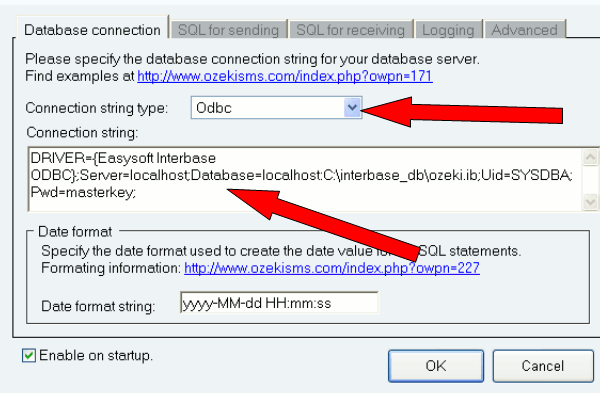 |
Figure 24 - Connection string
If it is done click on "OK".
Now it is time to test the system. To test the system it is needed to route all the incoming messages to the database user (Figure 25).
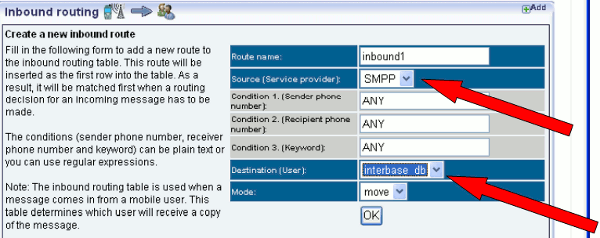 |
Figure 25 - Inbound route
Then it is needed to generate an incoming message via SMPP connection (Figure 26).
 |
Figure 26 - Incoming message
You can see the database user has been processed the incoming message (Figure 27).
 |
Figure 27 - Processed message
If you click on "SQL prompt" and query the content of table "ozekimessagein" ("select * from ozekimessagein" and click on execute) you will see that the incoming message has been successfully arrived at the table (Figure 28).
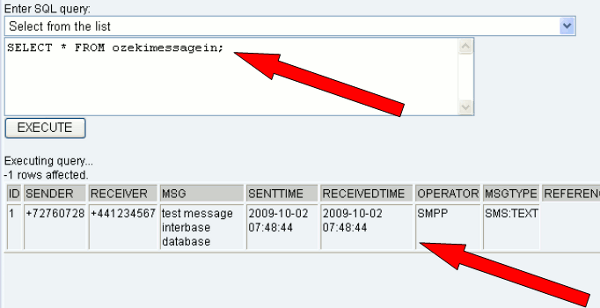 |
Figure 28 - Inserted message
To create an outgoing message, a row is needed to be inserted into table "ozekimessageout". To do this, select "insert into table ozekimessageout (receiver, msg, status) values ('+36201111111', 'Hello World', 'send');" and click on "Execute" (Figure 29).
 |
Figure 29 - Insert a new row into ozekimessageout
Click on "Events" and wait until Ozeki NG SMS Gateway polls out the affected row. Then you can see that the message has been processed and it sends the message (Figure 30).
 |
Figure 30 - Delivered message
Now you can see the sent message among the outgoing messages of the database user (Figure 31).
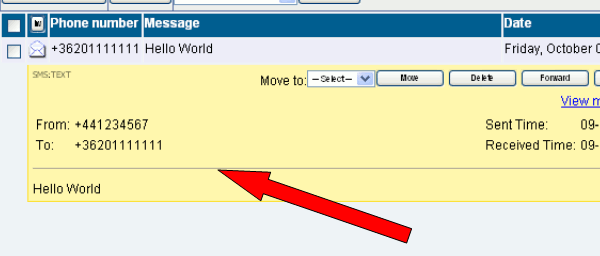 |
Figure 31 - Sent message
Thank you for reading this guide.
Please visit the
- Download Page to get Ozeki NG SMS Gateway to
add SMS functionality to Sharepoint
- Products Site to get information about Ozeki NG SMS Gateway and Wavecom Fastrack modem!
- Feature list of Ozeki NG SMS Gateway
- User Guide for Ozeki NG SMS Gateway
- Product manual
Request more information
If you are interested in this solution, let us know, so we can send you more relevant information and quotation with prices. Please fill in the following form:
