
 Sign in
 How to send SMS from VASCO Identikey
Ozeki offers a powerful solution for those who use Vasco Identikey
to improve security of corporate IT environment. With the use of
Ozeki NG SMS Gateway, SMS functionality can be added to your IT system. In
practice it means that Vasco Identikey includes Digipass which makes a
two-factor authentication possible. After you provide your password at the
initial login, Vasco's Digipass generates a one-time password. This
password will be sent to a given mobile phone or mobile phones with the help
of Ozeki NG SMS Gateway via SMS.
With this solution you will gain a flexible but a reliable and cost-effective
system to protect corporate data and sensitive information. It is the proper
solution against intruders and data thieves and it is possible to make online
attacks ineffective. The generated passwords are required at each login so
only authenticated users will gain access to your corporate IT network. These
passwords expire automatically after they were used. Furthermore if one-time
passwords have been failed to use the administrator can preset that the system
should deny access to resources partially or completely. He also can set which
certain specified options requiring SMS authentication should be allowed or
denied.
If you decide to setup an SMS system in your company you will get a
well-functioning and reliable system as this excellent solution provides a secure
way to handle corporate passwords.
Requirements
If you wish to setup this application you need to establish a connection
between your system and a mobile network. You can choose from two options: Internet connection
or wireless connection (when you attach a GSM phone or GSM modem to your computer). If you visit
the following website:
Internet based SMS connections vs. GSM modem based (wireless) SMS connections
you can decide easily which solution is the best for you. You will need different
tools for this application on the basis which solution you chose.
Requirements to connect your system to the Mobile network via the Internet
The following tools will be necessary if you wish to establish a connection between your system and an SMS service provider:
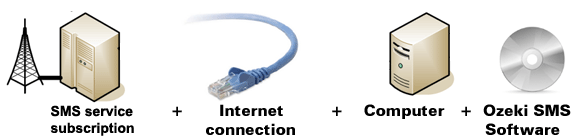
Figure 1/a - Prerequisites for Ozeki NG SMS Gateway IP SMS connection
You will need an SMS service provider who will be able to reach mobile phone surrounding
you. To help you find a provider who can provide SMS service via the Internet, we have
collected some provider on the following website:
SMPP SMS Service providers. After you have chosen
a provider and purchased its service you will get connection parameters and
with these parameters you can set Ozeki NG SMS Gateway software according to your needs.
Requirements to wireless connection to the Mobile network
To establish wireless connection between your system and the GSM modem, you will need a GSM modem/ GSM phone and with a data cable you can connect it to your computer. In this way your Ozeki NG SMS Gateway software can handle the phone and the software can manage messaging wirelessly. The following tools will be necessary if you wish to establish this connection method:
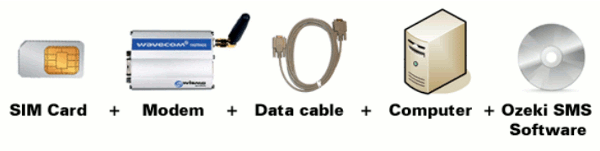
Figure 1/b - Prerequisites for Ozeki NG SMS Gateway GSM modem connection
Your prerequisites for GSM modem connection: |
SIM Card - You can purchase a SIM Card from your local mobile network service provider.* |
|
Modem - Use a Wavecom, Siemens or Multitech modem. |
|
Data cable - Comes with the modem |
|
Computer - Recommended: Intel P4 3Ghz, 2GB RAM, 500Mb HDD, Windows OS |
|
Ozeki NG SMS Gateway - Download it from http://www.sms-integration.com |
* The cost of an SMS message is determined by the price plan you have chosen when you have purchased the SIM card from your GSM mobile network operator.
|
| Ozeki NG SMS Gateway can be obtained by opening the download page: Download Ozeki NG SMS Gateway! |
System architecture
If you meet with all the hardware and software requirements you can start building a system based on SMS technology. It works as follows: First you need to log into Vasco Identikey on its login interface with your username and password. After this, Vasco Identikey generates a one-time password and forwards this generated password to Ozeki NG SMS Gateway through an HTTP request. The built-in webserver of the SMS gateway will accept this request and will send this generated password in an SMS to a given mobile phone. The gateway can send the SMS message through a mobile phone attached to the computer with a data cable or over the Internet. This process can be examined in Figure 2.
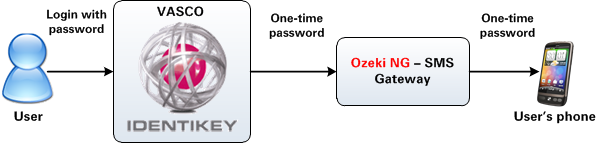
Figure 1 -Connection with Vasco Identikey
Please note that it is more secure to send the one time passwords using a GSM modem through the airwaves to the recipient, than through an Internet based SMS service provider account, because it is significantly harder to intercept an SMS message traveling through the air, than it is to intercept internet traffic.
Configuration Steps for Vasco Identikey SMS
Step 1.) Configure DIGIPASS Message Delivery component
Before you begin to follow the configuration steps of this guide, it is assumed that you have already installed VASCO Identikey and Ozeki NG - SMS Gateway into your computer.
You can use Ozeki NG - SMS Gateway as a virtual digipass in your system. A virtual digipass works as a regular digipass, but with a virtual digipass you can get the one-time passwords as a text message via Ozeki NG - SMS Gateway.
Click on Start menu, open the VASCO Identikey server folder, and launch Virtual DIGIPASS MDC Configuration (Figure 2).

Figure 2 - Launch Virtual DIGIPASS MDC Configuration
This will open the Message Delivery Component Configuration window. Here you can confugure the settings of the Message Delivery Component, and the methods of how you want to deliver the OTP via the Virtual Digipass. Click on SMS Delivery (Figure 3).
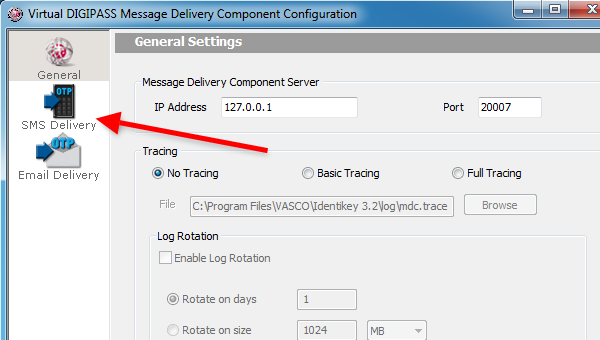
Figure 3 - Click on SMS Delivery
First, enable SMS delivery component by checking the checkbox at the top of the page. Then, add a new
gateway to your SMS Gateway list (e.g. ozeki). Provide the settings of the connection (Figure 4):
- URL: The url of the Built-in HTTP server of Ozeki NG - SMS Gateway. e.g.:http://192.168.91.31/api
- Port: The port of the HTTP server. e.g.: 9501
In this example I have installed Ozeki NG - SMS Gateway on a computer
which IP address is 192.168.91.31.
Next, fill the SMS Gateway Account Settings group:
- User name: The name of the user in Ozeki NG - SMS Gateway. e.g.: admin
- Password: The assigned password of the user. By default, it is abc123
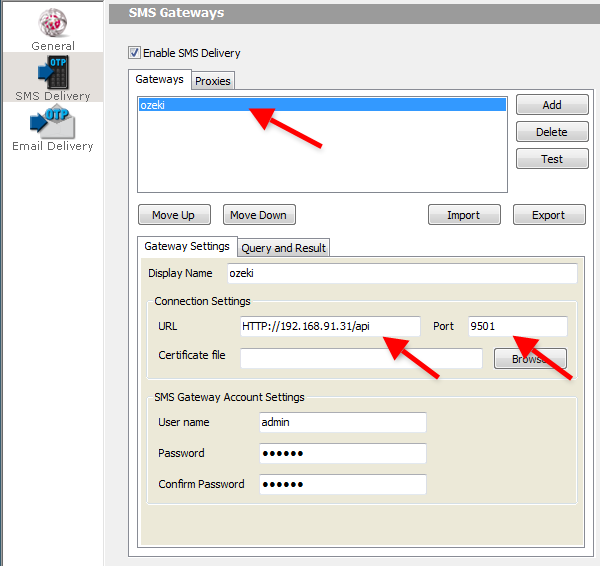
Figure 4 - Gateway Settings
Next, click on the Query and Result tab, and enter the following into the
Query String field:
Next, you need to provide a matching rule, which Vasco Identikey can use to search the HTTP response for success codes. For this, select the New Result item from the Matching Rules list, and click on Edit
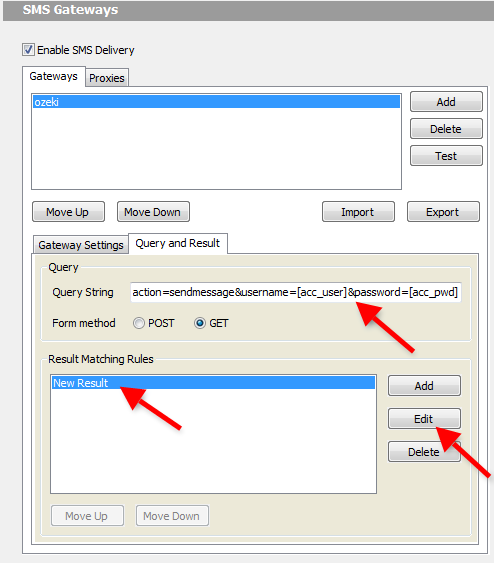
Figure 5 - Set the query string and create a matching rule
Next, paste the statuscode xml tag into the Matching Pattern box.
This xml tag indicates that Ozeki NG - SMS Gateway accepted the message from VASCO Identikey via its built-in HTTP server (Figure 6). When it is done, click on OK
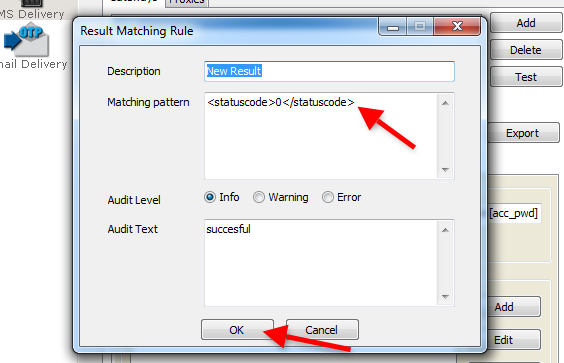
Figure 6 - Create Result matching rule
Click on OK. In order to apply the settings, you need to restart the service. Click on Yes to restart the service (Figure 7).
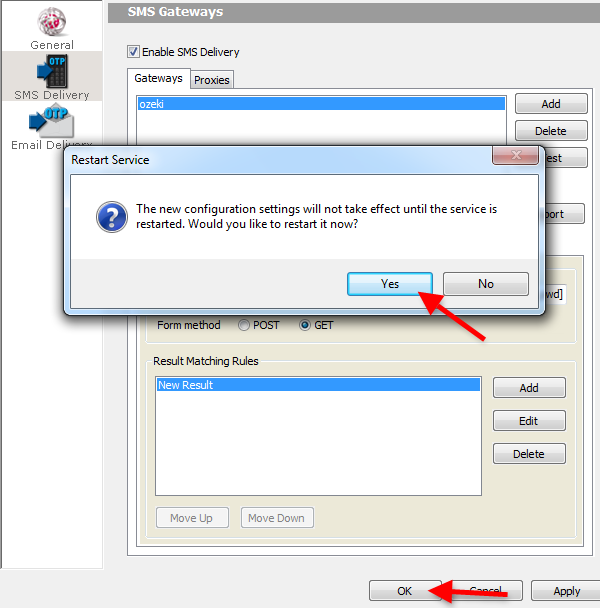
Figure 7 - Restart Service to apply settings
Now you need to configure Vasco Identikey server.
Step 2.) Configure Vasco Identikey serverNow you need to assign the virtual digipass to a user, who can use it to get the one-time passwords delivered into a mobile phones.
To do so, first you need to configure Vasco Identikey via its web interface. Click on Start menu, navigate to Vasco Identikey folder, and click on Identikey Web Administration (Figure 8).
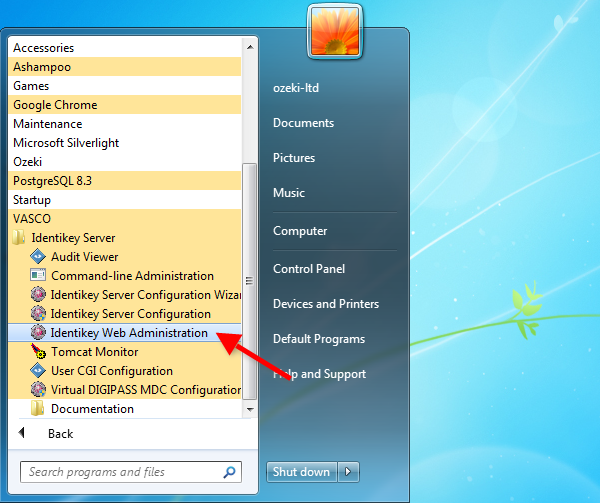
Figure 8 - Launch Identikey Web Admninistration
This will launch your web browser. The browser will load the login page of the web interface. Login with the administrator account (Figure 9).
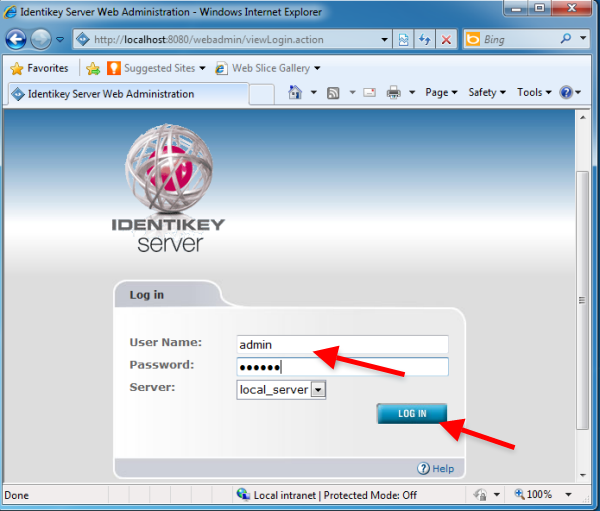
Figure 9 - Login as administrator
Once you logged in, click on Import at the Digipass drop-down menu (Figure 10).
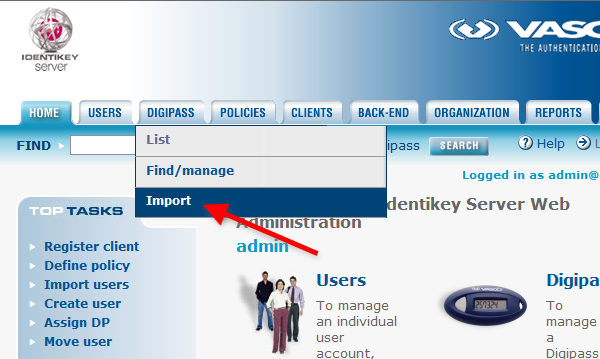
Figure 10 - Click on Import
Select the Virtual Digipass file, enter the transport key, and click on Upload (Figure 11).
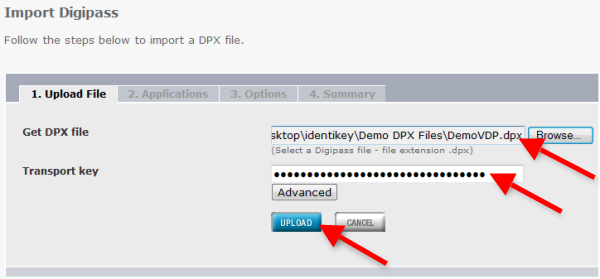
Figure 11 - Upload Virtual Digipass file
Select the digipass application of the uploaded file, and click on Next (Figure 12).
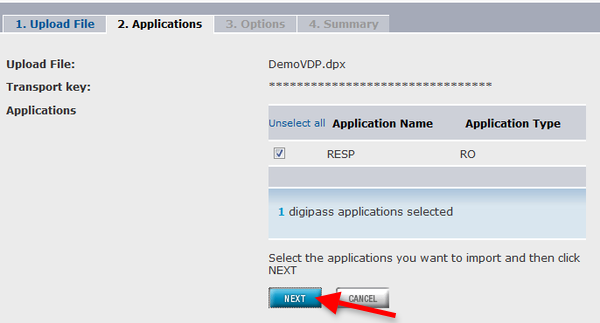
Figure 12 - Select digipass application
Leave the default settings unchanged and click on Import to import the digipass application (Figure 13).
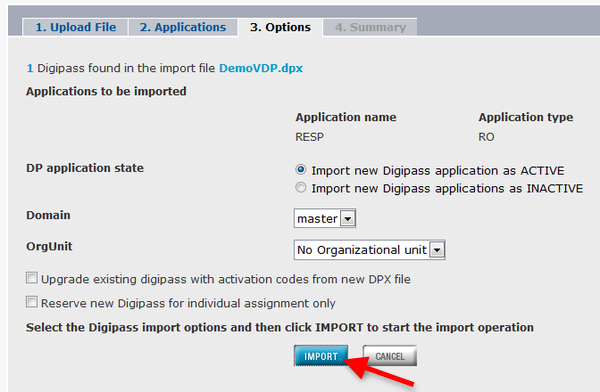
Figure 13 - Import digipass application
Once the import is done, you can see a summary of the import. Click on Finish (Figure 14).
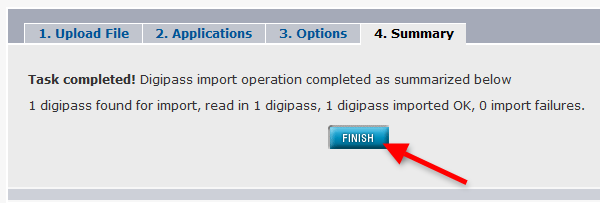
Figure 14 - Summary of the Import
Step 3.) Assign Digipass to users
Now you need to assing the imported digipass application to users.
First, click a List at the Users drop-down menu to list the users (Figure 15).
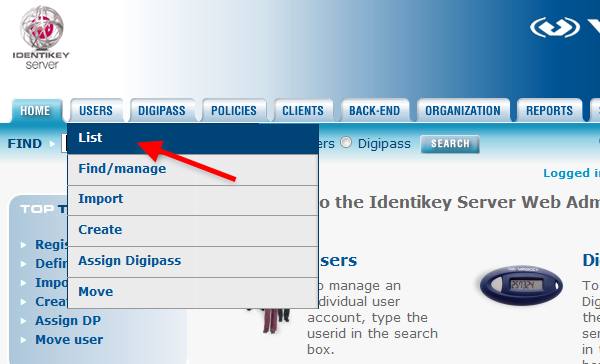
Figure 15 - Click on List
Click on the user's name to which you would like to assign the virtual digipass (Figure 16).
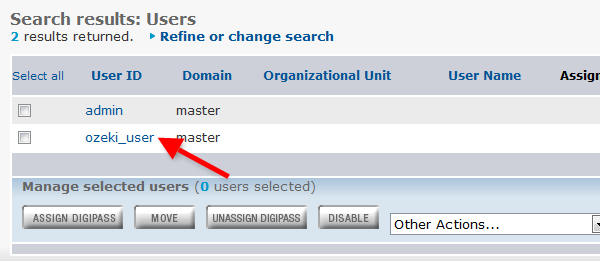
Figure 16 - Select a user
Now you are at the user management page. Click on the Assigned Digipass tab (Figure 17).
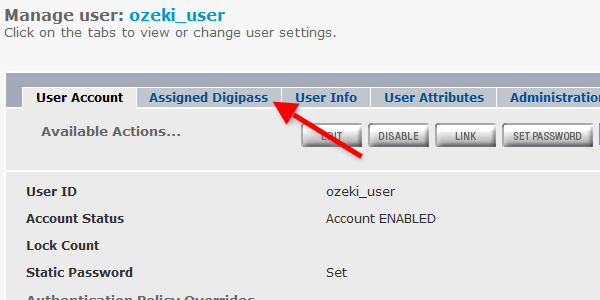
Figure 17 - Click on Assigned Digipass
Now you can see the assigned digipass of the user. Currently no device assigned to this user. Click on Assign to assign a digipass for this user (Figure 18).
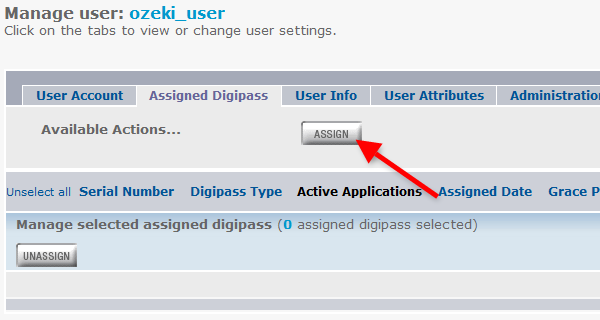
Figure 18 - Click on Assign
Click on Select from list at the Digipass Type field (Figure 19).
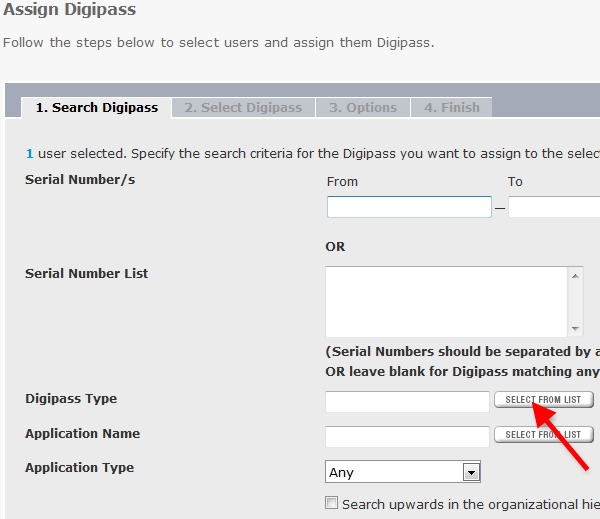
Figure 19 - Select from list
Set the digipass type to DPVTL and click on OK (Figure 20).
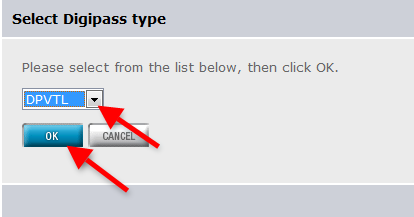
Figure 20 - Select digipass type
You will get back to the Assign Digipass page. You can see that the Digipass Type is set to DPVTL. Click on Next to continue (Figure 21).
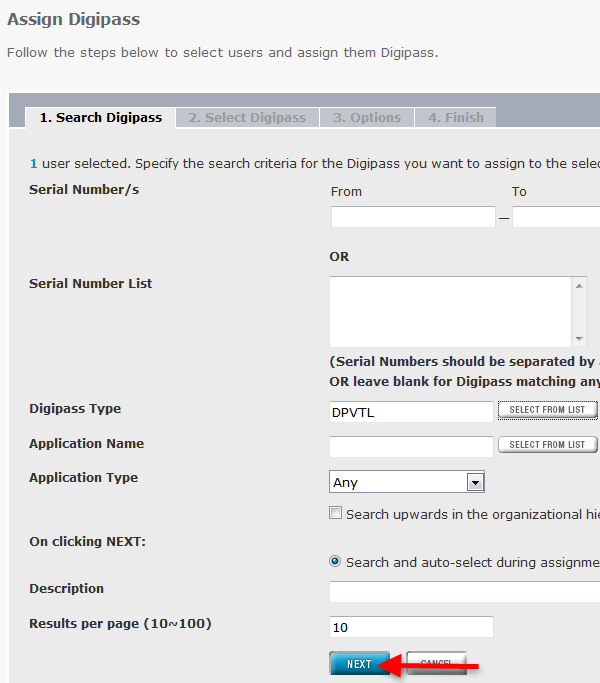
Figure 21 - Click on next
Enter a grace period (e.g. one week) and click on Assign (Figure 22).
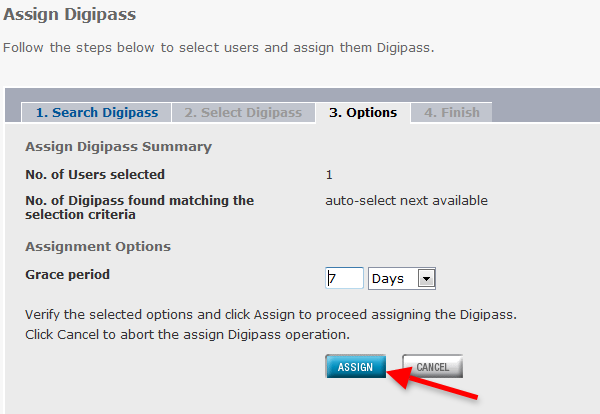
Figure 22 - Enter grace period
Now the configuration on Identikey is done and you can test the settings with Ozeki NG - SMS Gateway.
Step 4.) Test the system
Click on List at the Users drop-down menu. You can see that the user have the assigned digipass in its account. Click on the number of the assigned digipass (Figure 23).
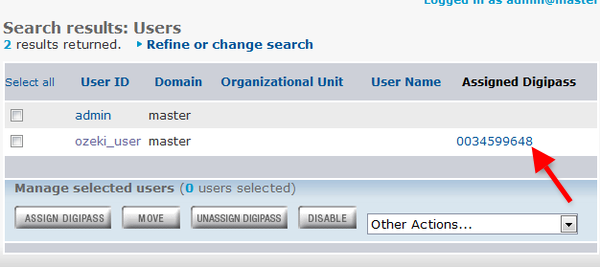
Figure 23 - Click on Assigned Digipass
Now you are at the Digipass management screen. Click at the RESP tab (Figure 24).

Figure 24 - Click on RESP
Click on Test VDP to test the functionality of the virtual digipass (Figure 25).
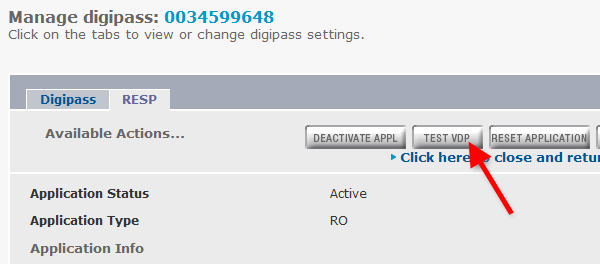
Figure 25 - Test Virtual Digipass
Select the SMS option at the Delivery Method field, enter your mobile number, and click on Generate (Figure 26).
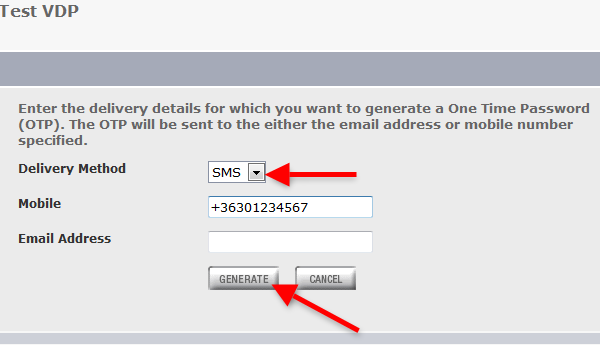
Figure 26 - Generate OTP
Now the Identikey server will generate a One-time Password and send it to your mobile phone as an SMS. you can see the sent message in Ozeki NG - SMS Gateway (Figure 27).

Figure 27 - Sent One-time password
Type the received One-time password to the Test VDP page (Figure 28).
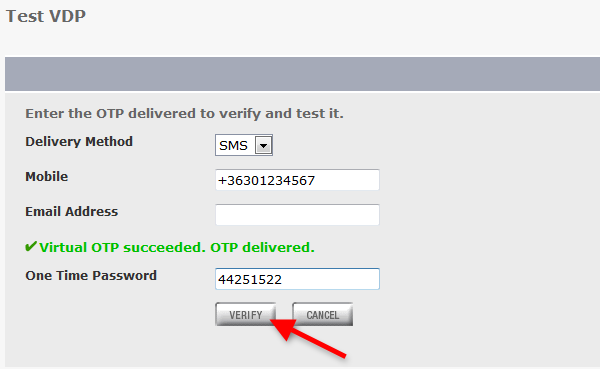
Figure 28 - Type the received one-time password
On figure 29 you can see that the sent One-time password is confirmed, and the test of the system is succesful.
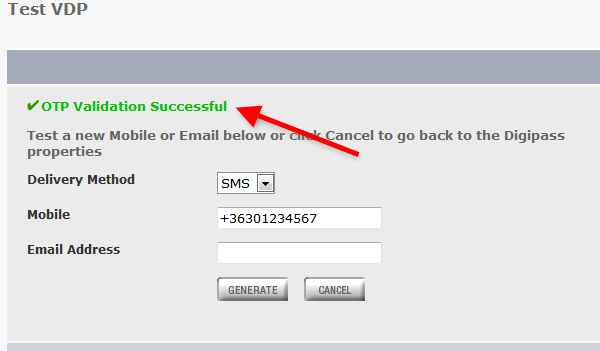
Figure 29 - Succesful validation
More information
- How to send SMS from Check Point Connectra
- How to send SMS from Vacman Middleware
- How to send one-time passwords from PHP
- How to send SMS from Strong Authentication Server
- Setup instructions for sending SMS from Vasco Identikey